In this post we will learn
DNS : An Introduction
DNS stands for "Domain Name System" , DNS is responsible for converting human readable name into IP address and vice-versa. Because its human nature that we can more easily remember names over numbers and IP address assign to any computer system is in decimal numbers. So we need a server who works for human to convert name into IP and vice versa. And thus DNS came in existence
You can read/learn the basic functionality of DNS in fun learning way from howdns.works. Its a fun learning way of DNS. Enjoy reading😀.
DNS Installation & Configuration
So now we know what is DNS and how it works. Now we are ready to install and configure DNS server. We perform this in our LAB environment. For this we will use CentOS 8 machines configured in our virtual box . We will also try to know its configuration parameters and purposes. Before installing and configuring our DNS server there are some prerequisites required as below.
1: You need three systems (VM machines) with Redhat/CentOS 8/7 operating system
2: Your machines should be in same network e.g using same subnet mask
3: Internet connection is required in order to install some packages.
4: User should have root/sudo access to configure DNS
itguyakay.local domain name . You can choose any name but make sure it should not be existed already in real world
ns1.itguyakay.local10.0.2.5/24
ns2.itguyakay.local10.0.2.6/24
host1.itguyakay.local10.0.2.100/24Primary DNS Server Installation
Now we are ready to install and configure DNS server in our setup. First of all we will configure our primary DNS server. Please follow below steps in order to install and configure primary DNS server .
1: Login as root in your master DNS server machine & set the hostname for the machine as below. This will be a FQDN name for your server which will be resolved with in a domain. The hostname will be reflect after re-login.
$ hostnamectl set-hostname
2: Now check for the update in your server and install neccessary packages to configure DNS. In redhat based system the package name for DNS server is BIND.
$ yum
3: Once packages are installed, make sure your IP address should be static as DNS works only on static IP. For this , first of all make copy of your current active network configuration file.
$ cp
Note: replace the network interface name as per your machine , here in example it is enp0s3.
4: Edit the network interface configuration file with any terminal based text editor (e.g vim,vi,nano).
$ vi
5: Edit/add below lines in network configuration file.
BOOTPROTO=none
IPADDR=10.0.2.5
NETMASK=255.255.255.0
GATEWAY=10.0.2.1
And save & exit
Example: Secreenshot of static network configuration for ethernet .

|
6: Now you have to configure DNS main configuration file named.conf. You can find this file under /etc/named.conf.
i) Before edit the file make a backup copy incase you need default configuration file.
$ cp
ii) Now edit the named.conf file. This file is a collection of statements. The statement contains elements which defines the properties of your DNS server. Elements should be declared between
a)
- you have to edit/add below elements in option statement.
listen-on port 53 { 127.0.0.1;10.0.2.5; };
#listen-on-v6 port 53 { ::1; };
allow-query { trusted; };
allow-transfer { 10.0.2.6; };
After edit the option element, it should be looks like below
Example: Screenshot of named.conf file . Pic 1/2
listen-on port : It defines the network interface on which DNS will listen to resolve queries.
allow-query : Defines who will allow to query DNS
allow-transfer : Transfer queries to secondary/backup DNS server
comment : any line start with
b)
- Create acl statement as shown below in named.conf file.
acl "trusted" {
10.0.2.5; # ns1
10.0.2.6; # ns2
10.0.2.100; # host1
};
c)
- Now define your zone statements in the named.conf file . There are two type of zones statements we have to define. One for forward query [Name to IP] and another for reverse query [IP to Name].
zone "itguyakay.local" {
type master;
file "/var/named/zone/forward.itguyakay.local"; # zone file path
};
zone "2.0.10.in-addr.arpa" {
type master;
file "/var/named/zone/reverse.10.0.2"; # 10.0.2.0/24 subnet
};
Example: Screenshot of named.conf file. Pic 2/2
iii) Don't delete/make any changes in any other statements. Save the named.conf file and exit
7: Now you have to create the zone's configuration file, By default , its should be under /var/named/ directory. A zone's configuration files defines many paramenters including domain/owner name, admin/master username , TTL for your DNS server, authoritative information of DNS zone, delegates name servers for your DNS, refresh,retry and expiration time for zone etc.
i) First create a "forward name resolution" zone file in /var/named/zone/
mkdir /var/named/zone
vi /var/named/zone/forward.itguyakay.local
ii) add below enteries in the above file
$TTL 86400
@ IN SOA ns1.itguyakay.local. admin.itguyakay.local. (
20201206 ; Serial
21600 ; refresh after 6 hours
3600 ; retry after 1 hour
604800 ; expire after 1 week
86400 ) ; minimum TTL of 1 day
; name servers - NS records
IN NS ns1.itguyakay.local.
IN NS ns2.itguyakay.local.
; name servers - A records
ns1.itguyakay.local. IN A 10.0.2.5
ns2.itguyakay.local. IN A 10.0.2.6
; host machines - A records
host1.itguyakay.local. IN A 10.0.2.100
Example: Screenshot of forward zone file
iii) Save the file and exit.
SOA : Start of authority , contains administrative information about the zone, especially regarding zone transfers
IN : The internet .
@: Start of the authoritative zone
TTL: Time To Live, minimum refresh time for zone to keep values in its cache by resovler.
NS: Name Servers, the authoritative name server for the domain.
A: Address Record, mapped ip address with its hostname
Learn More About Resource Record
iv) Now create the "reverse name resolution zone file" by running below command
vi /var/named/zone/reverse.10.0.2
v) add below enteries in the that file
$TTL 604800
@ IN SOA ns1.itguyakay.local. admin.itguyakay.local. (
20201206 ; Serial
21600 ; refresh after 6 hours
3600 ; retry after 1 hour
604800 ; expire after 1 week
86400 ) ; minimum TTL of 1 day
; name servers - NS records
IN NS ns1.itguyakay.local.
IN NS ns2.itguyakay.local.
; PTR Records
5 IN PTR ns1.itguyakay.local.
6 IN PTR ns2.itguyakay.local.
100 IN PTR host1.itguyakay.local.
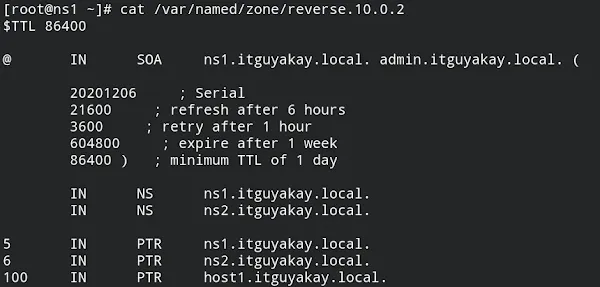
Example: Screenshot of reverse zone file
vi) Now save and exit from reverse zone file.
PTR: Pointer, work same as A record but for recursive purposes, the IP address part will be in reverse order e.g 5.2.0.10 is PTR for IP address 10.0.2.5 , here we only mapped the host bit of IP address because the rest part we already has defined in the reverse zone file name
8: Now you are ready to check if all the configuration we do in above steps are OK. For this run below command to check the configuration files parameters for any syntax errors
named-checkconf
If syntax error will found then you will get some error as a reply otherwise you will get no output.
9: Now run below commands to check and verify the zones files for any errors
named-checkzone itguyakay.local /var/named/zone/forward.itguyakay.local
named-checkzone 2.0.10.in-addr.arpa /var/named/zone/reverse.10.0.2
You should get the
Example: screenshot fo zone file configuration parameters checking
10: Now restart and enable the DNS (named.services) with below commands
sudo systemctl start named
sudo systemctl enable named
11: Now enable port number for DNS to listen queries out from your local machine
firewall-cmd --permanent --add-port=53/udp
12: Now at last you have to edit your network configuration file in order to add DNS server addresses and Domain Name.
i) Edit network interface configuration file
vi /etc/sysconfig/network-scripts/ifcfg-enp0s3
ii) Append below lines in the ifcfg-xxxx file
DNS1=10.0.2.5
DNS2=10.0.2.6
DOMAIN=itguyakay.local
iii) Restart your interface with below command, please change your network interface name in below command
ifdown enp0s3 && ifup enp0s3
Example: screenshot of network configuration file
13 : Verify your DNS enteries in /etc/resolv.conf file and it should have below entries.
cat /etc/resolv.conf
search itguyakay.local
nameserver 10.0.2.5
nameserver 10.0.2.6
At this point we have successfully configure our DNS primary server. Now we are ready to move further to install our DNS secondary server which will act as backup DNS server in our domain environment. Lets start configuring secondary DNS server...
Secondary DNS Server
1: Change hostname of your secondary DNS server with below command
hostnamectl set-hostname ns2.itguyakay.local
2: Check for system update and install BIND packages
yum update && yum install bind bind-utils
3: Configure static IP in your current active network interface configuration file.
vi /etc/sysconfig/network-scripts/ifcfg-enp0s3
BOOTPROTO="none"
IPADDR=10.0.2.6
NETMASK=255.255.255.0
GATEWAY=10.0.2.1
4: Create copy of your default /etc/named.conf file if required later.
mv /etc/named.conf /etc/named.conf.orig
i) Open file with any text editor
sudo vi /etc/named.conf
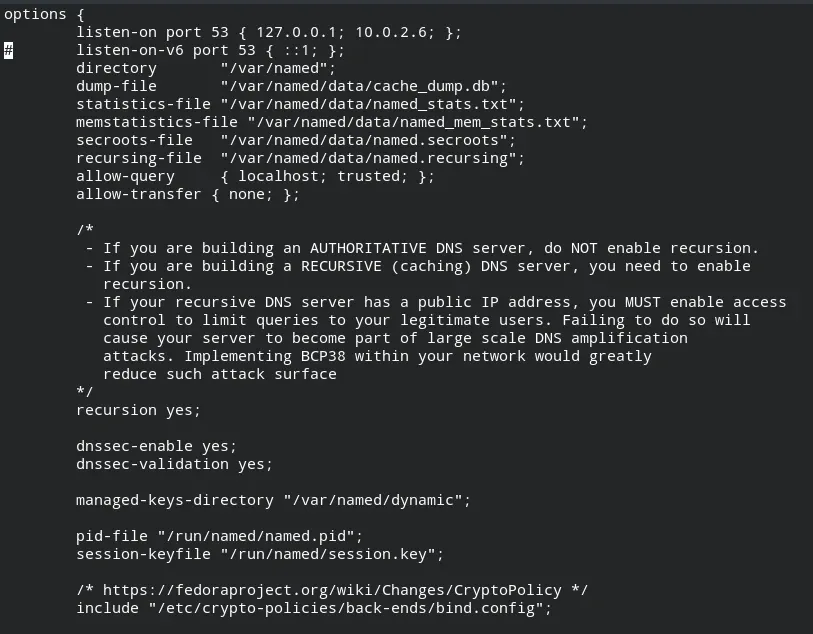
ii) Add/edit below statements in the /etc/named.conf file
a)
listen-on port 53 { 127.0.0.1;10.0.2.6; };
#listen-on-v6 port 53 { ::1; };
allow-query { localhost; trusted; };
allow-transfer { none; };
b)
acl "trusted" {
10.0.2.5; # ns1
10.0.2.6; # ns2
10.0.2.100; # host1
};
c)
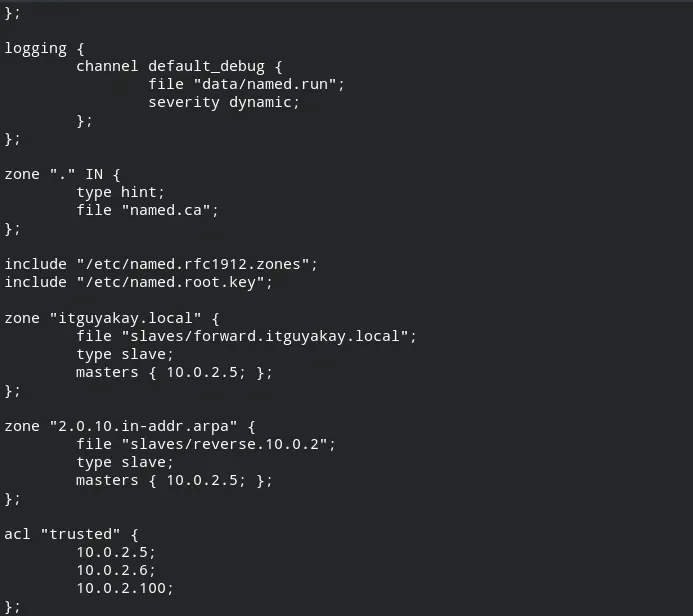
/etc/named.conf file
zone "itguyakay.local" {
type slave;
file "slaves/forward.itguyakay.local";
masters { 10.0.2.5; }; # ns1 private IP
};
zone "2.0.10.in-addr.arpa" {
type slave;
file "slaves/reverse.10.0.2";
masters { 10.0.2.5; }; # ns1 private IP
};
d) Your final /etc/named.conf file should be looks like this 👇
Example: screenshot of named.conf file . pic 1/2
Example: screenshot of named.conf file . pic 2/2
5: Verify your configuration for any syntax error
$ named-checkconf
6: Now run below commands to restart & enable named services and allow firewall to communicate our secondary DNS server to communicate outside from local machine.
$ sudo systemctl start named
$ sudo systemctl enable named
$ firewall-cmd --permanent --add-port=53/udp
7: At last again edit the network configuration file /etc/sysconfig/network-scripts/ifcfg-enp0s3 and add below entries in it
DNS1=10.0.2.5
DNS2=10.0.2.6
DOMAIN=itguyakay.local
Setup Host Machine
Now we have to configure our host machine so it can query our DNS servers. we can add multiple machines in our domain to resolve thier FQDN but we have to edit the ACL statements add IP and hostname for that host machine in DNS server's named.conf file.
Follow below steps to configure your host machine.
1: Change the hostname for your host machine
$ hostnamectl set-hostname host1.itguyakay.local
2: Now check for system update and install bind-utils package in it
yum update && yum install bind-utils
3: Now edit the network configuration file and give a static ip which is allowed by our named.conf file in primary server
vi /etc/sysconfig/network-scripts/ifcfg-enp0s3
4: Add below lines in /etc/sysconfig/network-scripts/ifcfg-enp0s3 file ,then save and exit
BOOTPROTO="none"
IPADDR=10.0.2.100
NETMASK=255.255.255.0
GATEWAY=10.0.2.1
DNS1=10.0.2.5
DNS2=10.0.2.6
DOMAIN=itguyakay.local
5: Verify /etc/resolv.conf file, and check below enteries in that file.
search itguyakay.local
nameserver 10.0.2.5
nameserver 10.0.2.6
Test DNS Server
Now its time to test our DNS server. run below command from your host machine to query DNS server. There are three utilities included in bind-utils package which we can use to make query request to resolve names.
1: Using nslookup utility
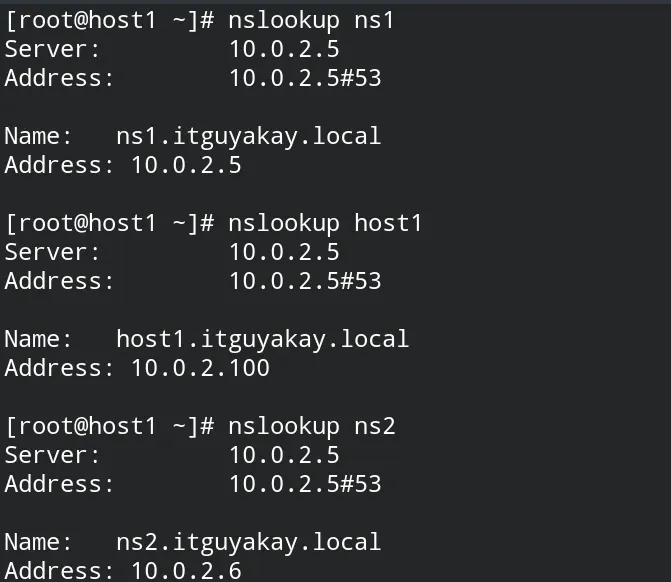
nslookup ns1
You should get response from your server
Example: Screenshot of nslookup queries on host machine
2: Reverse query using dig utility
dig -x 10.0.2.100
Example: Screenshot of dig queries on host machine
3: Make query using host utility
Example: Screenshot of host queries on host machine
Final Words
So this is the way that you can configure your own DNS server. This is the private DNS server because we limit the users/machine to make queries to our DNS server. if you want to make it public DNS server then edit your ns1 and ns2 server machine's /etc/named.conf file and in allow-query element option, instead of trusted type "any". This will make it a public DNS server. This is not the only way. read official documentation to learn more. I recommend below references to learn more about DNS server.
references : wiki, bind9, digitalocean, redhat .


0 Comments