In this tutorial, I am going to explain how to setup Nextcloud-AIO server in your local network using localDNS and self-signed certificate to resolve our Nextcloud-AIO server domain name ( e.g nextcloud.homeserver.lan ) locally.
NOTE : You may watch this tutorial video on my YouTube channel.
Goal
The main goal of this guide is :
Setup Nextcloud-AIO server on LAN network.
Setup local DNS to resolve Nextcloud-AIO server address.
No real valid CA certificate required.
No internet required to access Nextcloud-AIO server or account in your local network.
Limitation
As this guide is pure LAN based setup, there are only two limitation as below:
The talk function will not work in this setup as it requires an encrypted setup which the self-signed cert lacks due to Nextcloud-AIO security implemention & browser restriction.
One obvious limitation is that you must have to connect your local network to access your nextcloud account.
Pre-requisite
Below are some pre-requisite that you must fulfill in order to setup Nextcloud-AIO for your local network.
A Linux based host system with at least 2 GB free RAM with 10 GB free disk space and 2 CPU cores.
Basic Linux knowledge to run commands on system.
Internet connection to download required package / software.
A configurable router so you can edit DNS entry to route query to local DNS.
`sudo` or `root` access to run some commands.
NOTE: This guide is tested on Linuxmint. However you may setup Nextcloud-AIO in any supported Linux distro.
Early setup
There are two things we have to setup before we start setting up Nextcloud-AIO server in system.
1. Static IP Address
You must have static IP configuration for your host system so that our local DNS server work flawlessly. Use Network Connection setting option to configure static IP for your host system.
For this demonstration I will use below IP configuration :
IP address: 10.68.96.127 Subnet Mask: 255.255.255.0 Gateway: 10.68.96.100
2. Hostname
You must have to set a short and suitable hostname for your host system. In this guide I will use the hostname as homeserver.
3. Domain Name
We will use nextcloud.homeserver.lan as a domain name for our Nextcloud-AIO server in this guide. You are free to choose any desired domain name for your local environment setup.
Note: Please replace the domain name where ever mentioned in this guide with your one.
Main Setup
Now we are ready to setup Nextcloud-AIO in our host system. We will do this step by step.
Step 1. Software Installation
System Update : Run this command to make sure your system is up to date so we will get the latest packages for our setup.
sudo apt update && sudo apt upgrade -y
Install Docker : Visit this official link to install docker in your system or simply run below command.
curl -FsSL https://get.docker.com | sudo sh
Modify User Group : Add your current logged in user to newly created `docker` group so we don't need to run sudo for docker commands.
sudo usermod -aG docker $USER
newgrp docker
Install DNSmasq : Now we need to install DNSmasq in our system which will serve as a lightweight DNS server for our LAN network.
Run below command to install DNSmasq.
sudo apt install dnsmasq -y
Step 2. Test Docker and Configure DNSmasq
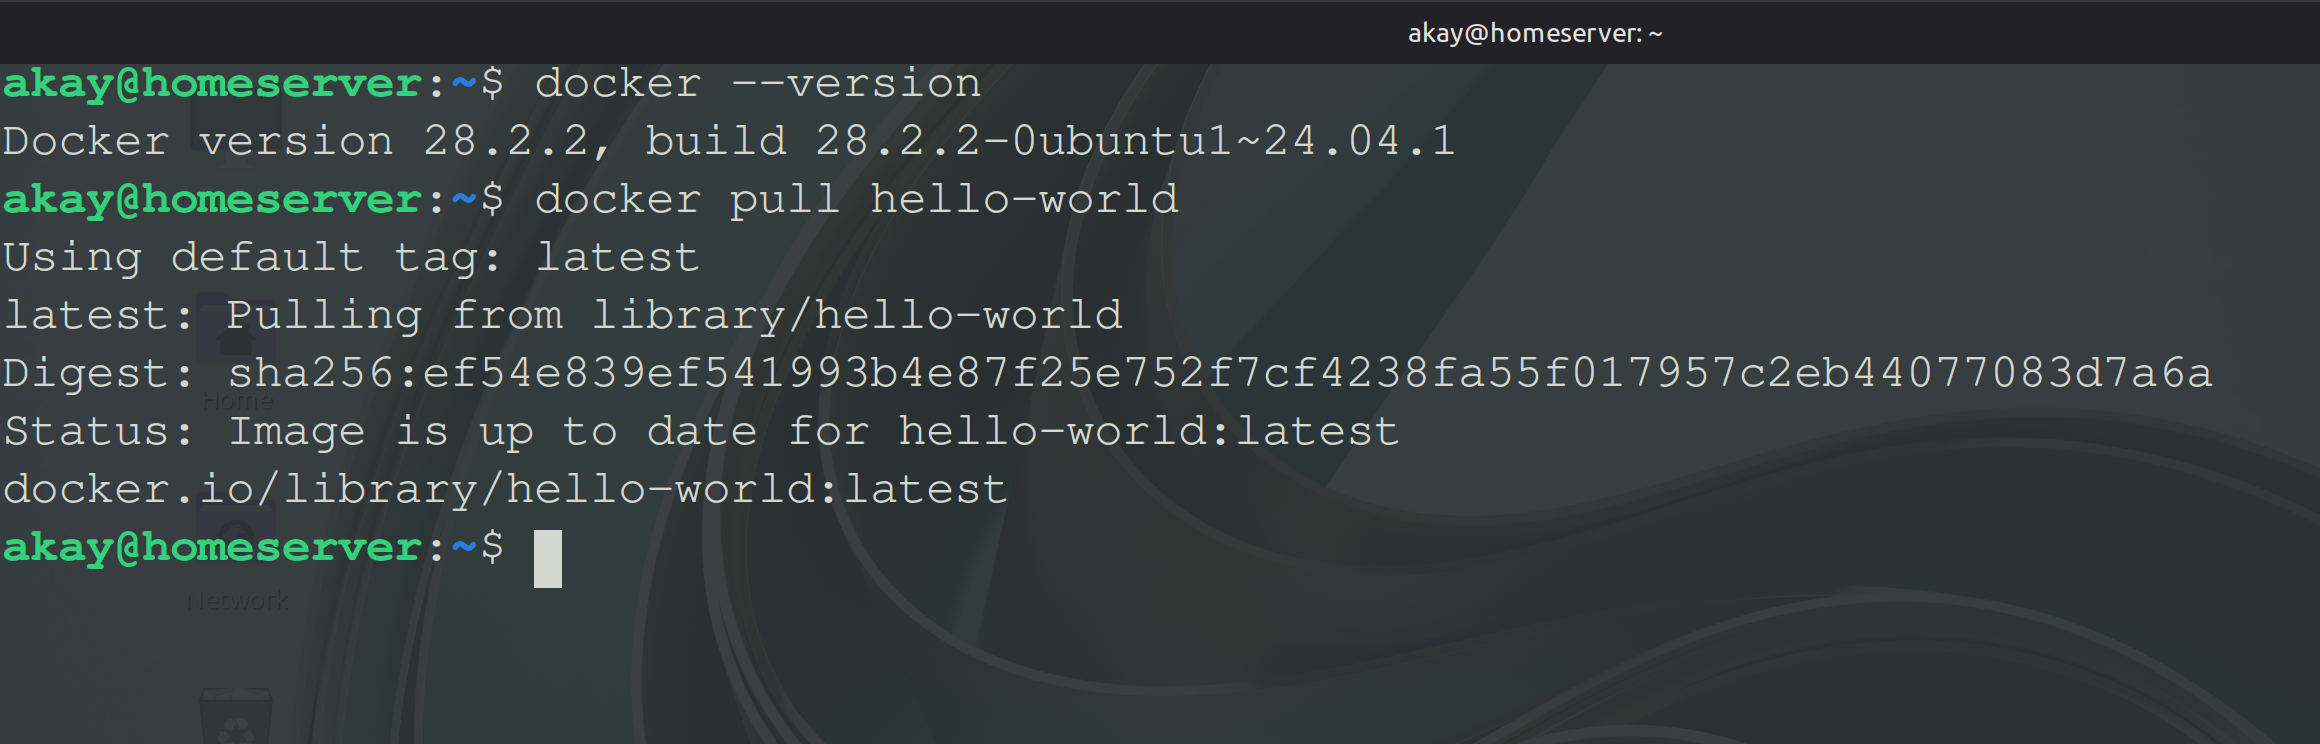
Run below commands to test if the docker has been installed and working properly.
docker --version
docker pull hello-world
Image:2a- Verifying Docker
Follow below steps to configure DNSmasq in host system.
ii) create a new dnsmasq.conf file using below command.
sudo vim /etc/dnsmasq.conf
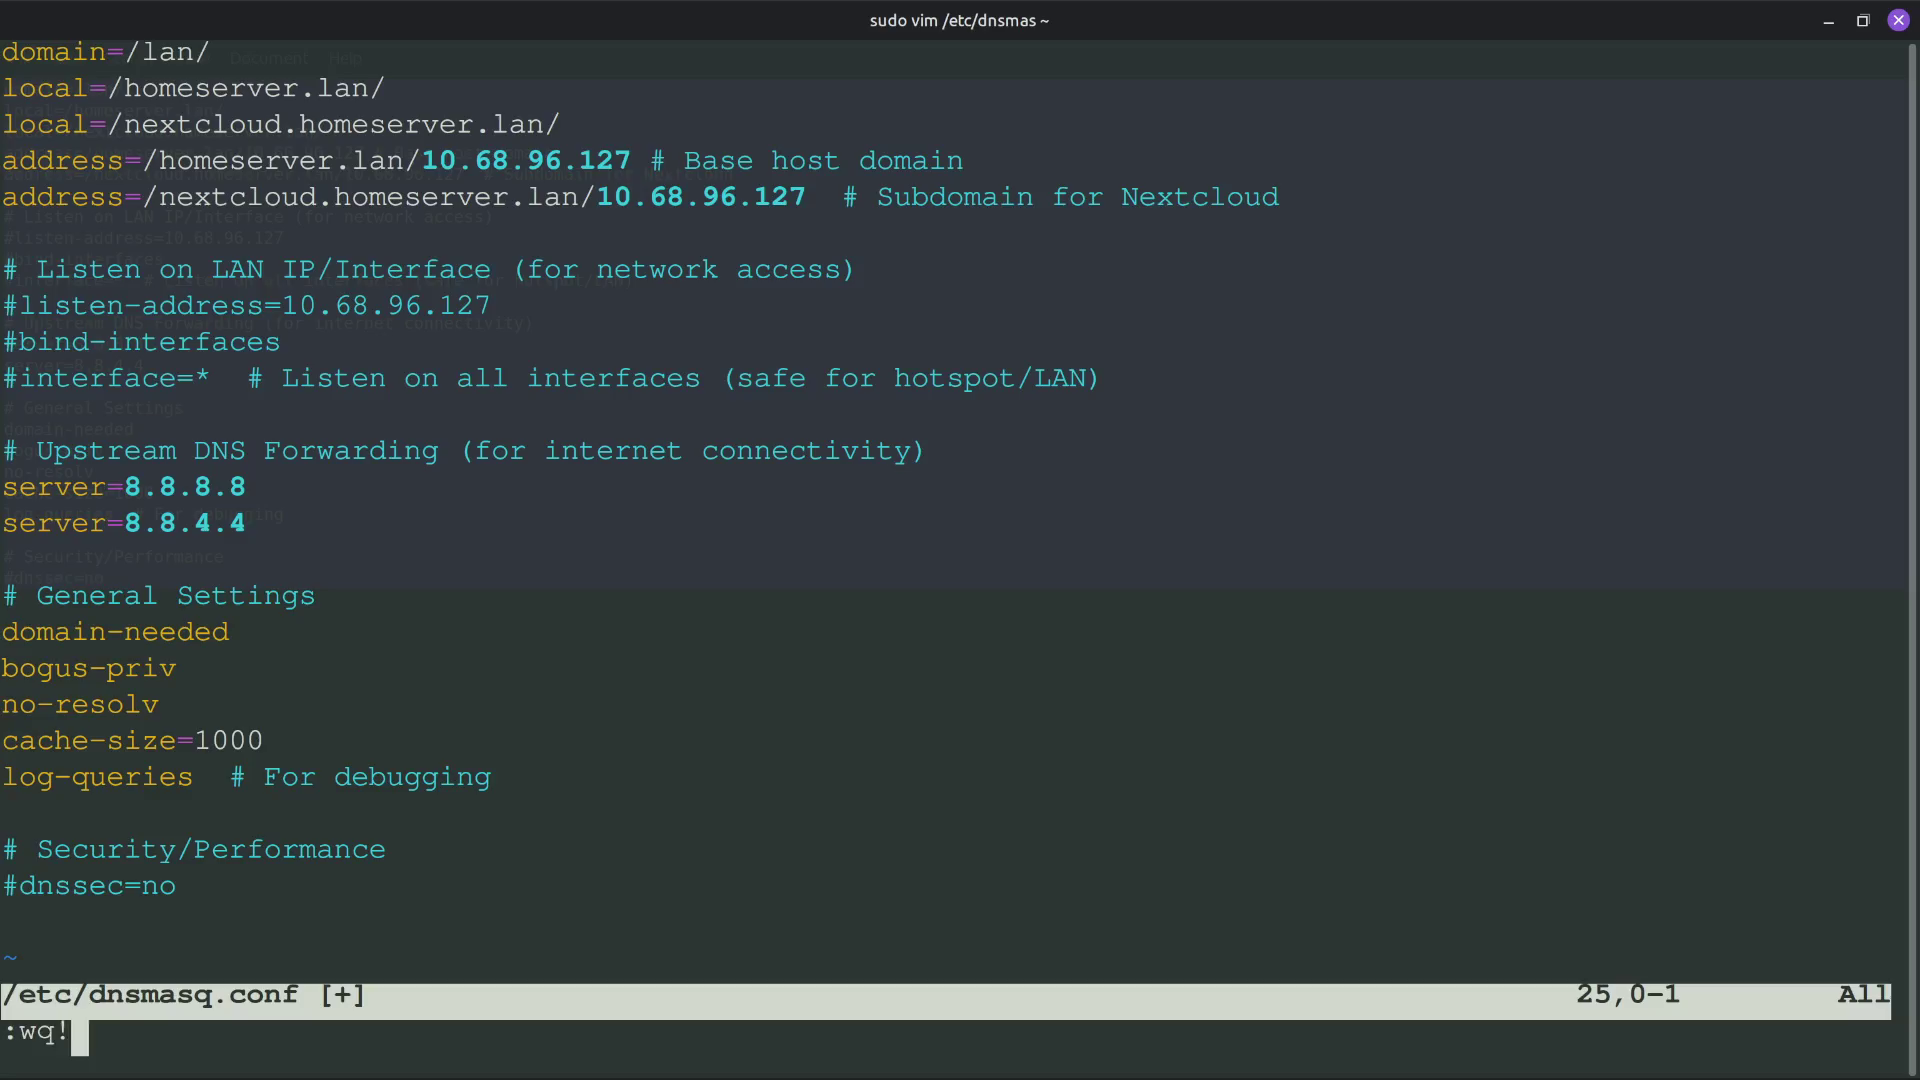
iii) put the below configuration into this dnsmasq.conf file and save it.
#local domain parameters
domain=/lan/ #our defined local domain
local=/homeserver.lan/ #to resolve locally
local=/nextcloud.homeserver.lan/  #to resolve locally
address=/homeserver.lan/10.68.96.127 #host system domain name
address=/nextcloud.homeserver.lan/10.68.96.127  # Subdomain for Nextcloud server

#Listen on LAN IP/Interface (for network access)
#listen-address=10.68.96.127
#bind-interfaces
#interface=*  # Listen on all interfaces (safe for hotspot/LAN)

# Upstream DNS Forwarding (for internet connectivity)
server=8.8.8.8
server=8.8.4.4

# General Settings
domain-needed
bogus-priv
no-resolv
cache-size=1000
log-queries  # For debugging

# Security/Performance
#dnssec=no
Note: i) Please modify the configuration ( e.g IP address , domain namesetc) as per your environment. ii) If you want your DNS server should listen on any specific IP or Interface, Please define that under " Listen on LAN IP/ Interface ( for network access)" in above configuration. Otherwise it will listen on any IP and any interface.
Image:2b(iii)-Sample DNSMasq Configuration Fileiv) Now test the dnsmasq.conf file configuration by running below command.
sudo dnsmasq --test
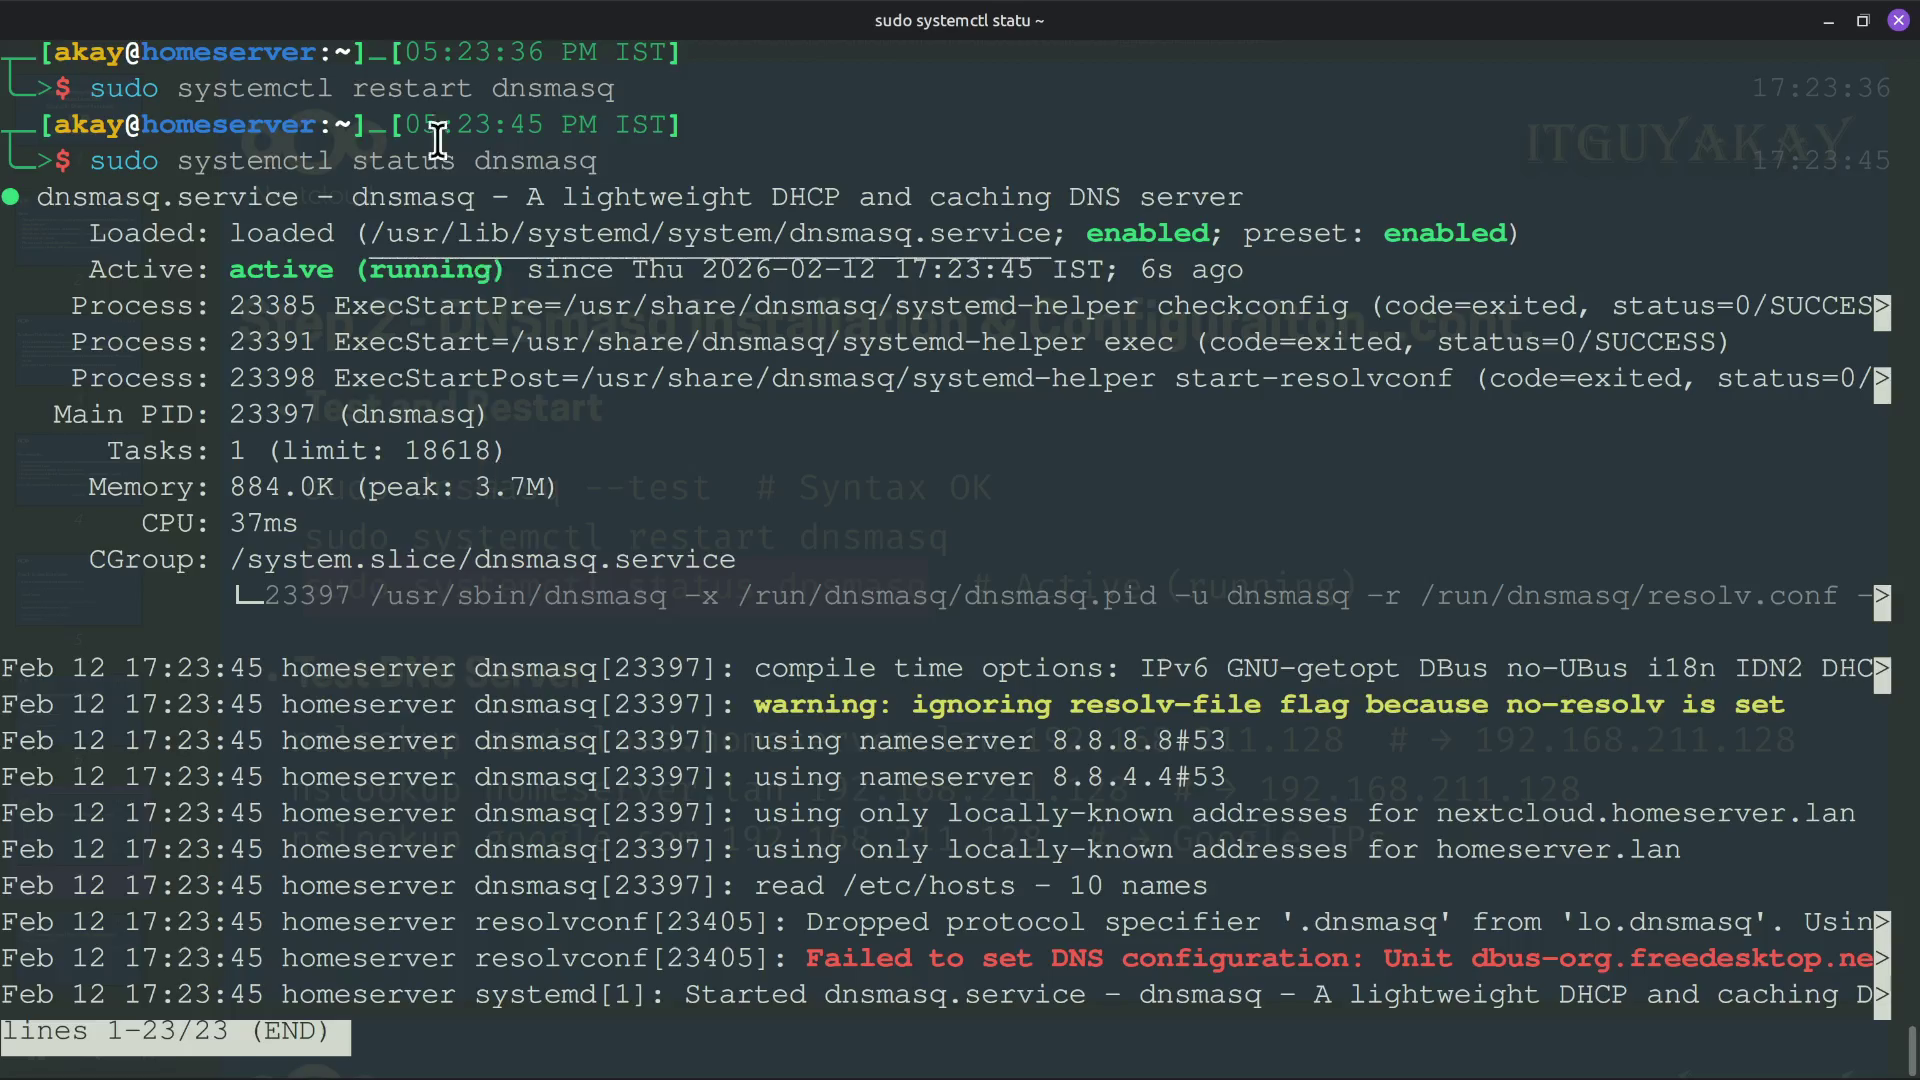
v) Then run below commands to start DNSmasq services in host system.
sudo systemctl restart dnsmasq
sudo systemctl status dnsmasq
Image:2b(v)-DNSmasq Status
vi) Modify the /etc/hosts file with below configuration. So our host system can resolve the domain name within system in case DNS server fail.
sudo vim /etc/hosts
#append  below line in your /etc/hosts file
10.68.96.127	homeserver.lan	homeserver  nextcloud.homeserver.lan
vii) Now run below commands to test our DNS server.
nslookup nextcloud.homeserver.lan 10.68.96.127
nslookup homeserver.lan 10.68.96.127
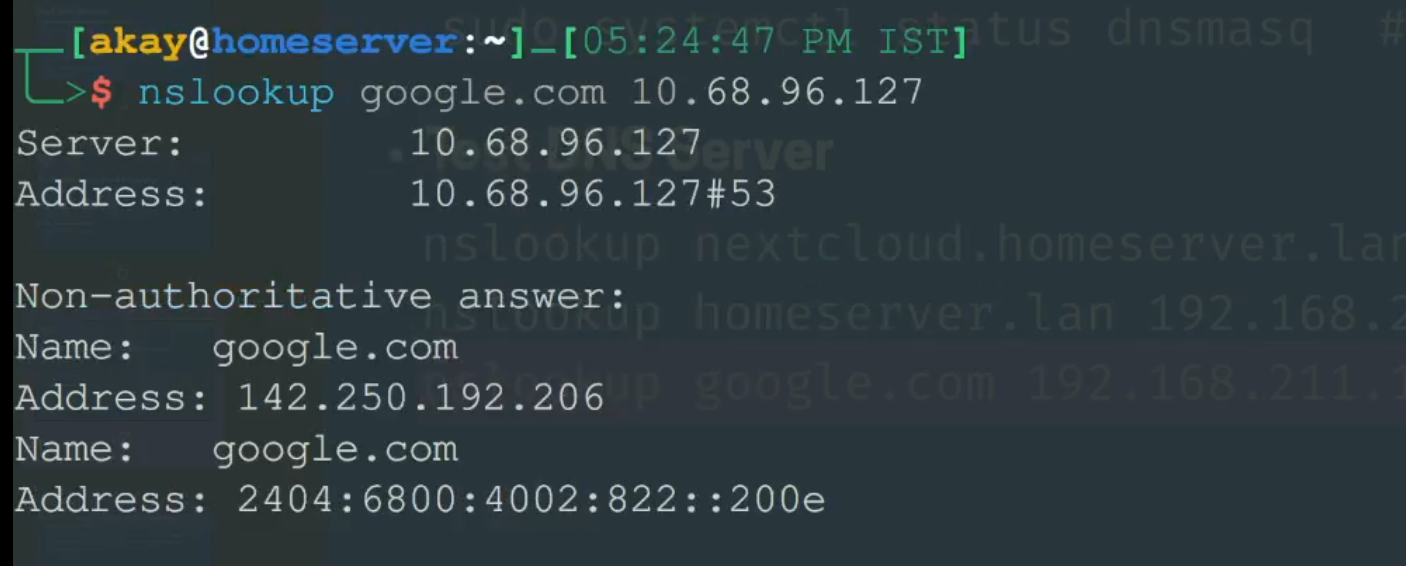
nslookup google.com 10.68.96.127
Image:2b(vii)-Test DNS Server
Step 3. Configure Firewall
Now we need to add some rules in our Firewall, so our Nextcloud-AIO server can listen on specific ports. In debian based system ( Ubuntu, Linuxmint etc) UFW is the default application to manage firewall. If you have some other firewall manager configure it accordingly.
run below commands to add firewall rules in your host system.
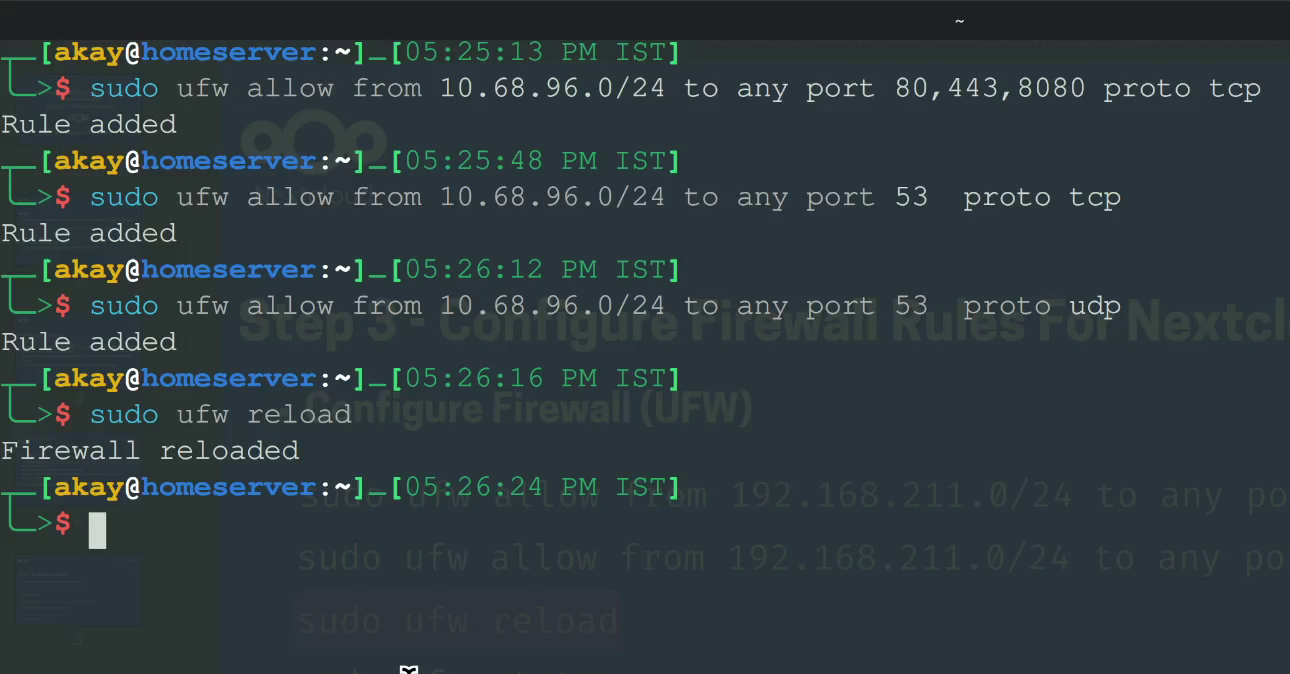
sudo ufw allow from 10.68.96.0/24 to any port 80,443,8080 proto tcp
sudo ufw allow from 10.68.96.0/24 to any port 53 proto udp
sudo ufw allow from 10.68.96.0/24 to any port 53 proto tcp
sudo ufw allow from 172.16.0.0/12
sudo ufw reload
sudo ufw status
Image:3a-UFW Firewall Rules
Step 4. Generate Self-Signed Cert for Subdomain
Create below directories under current logged in user account.
mkdir -p /home/user/docker/nextcloud/proxy/certs
This cert directory contains the self signed cert files.
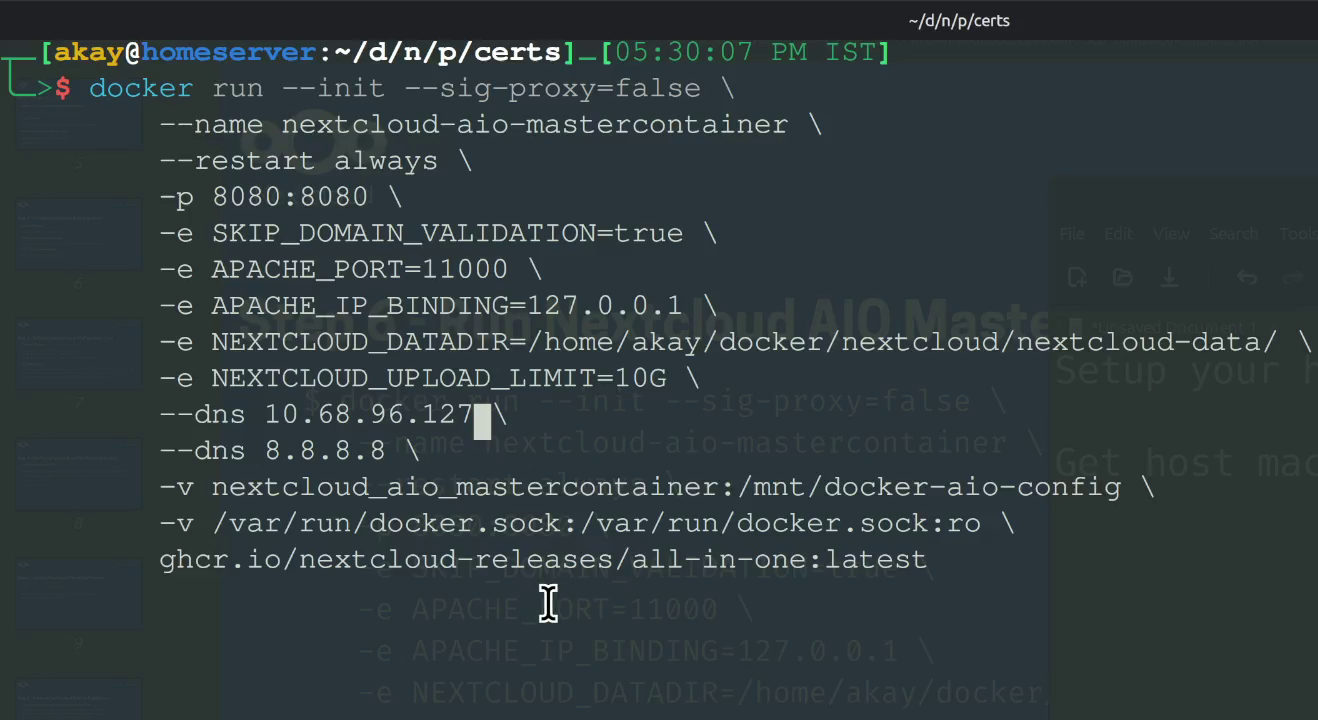
Note: - Please wait for few minutes to get it download & run. - Map NEXTCLOUD_DATADIR variable path with your nextcloud-data directory path and dns should be your host system IP address. - Run docker ps command to verify if container is running or not.
Image:5a-Nextcloud-AIO Startup Command
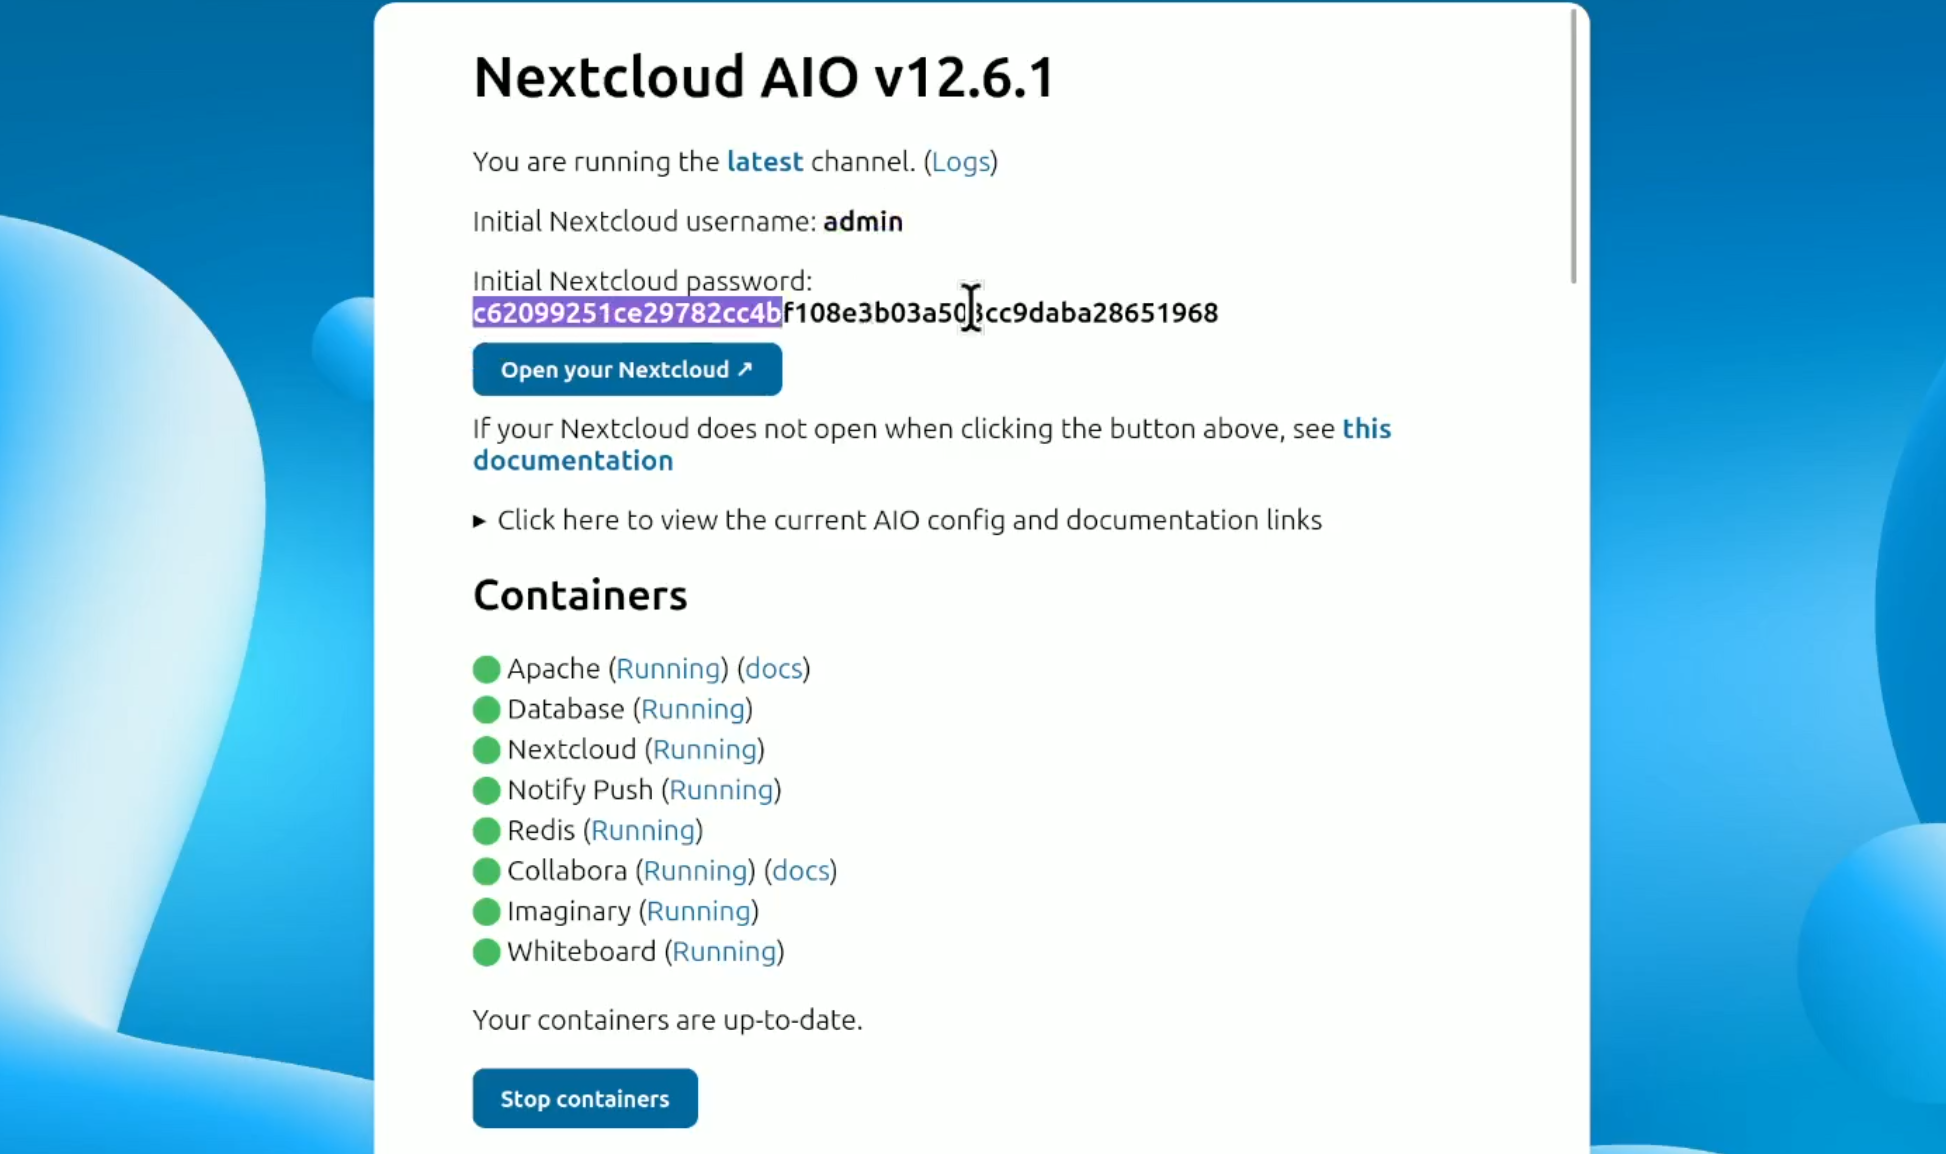
Step 6. Initial Setup Of Nextcloud-AIO Server
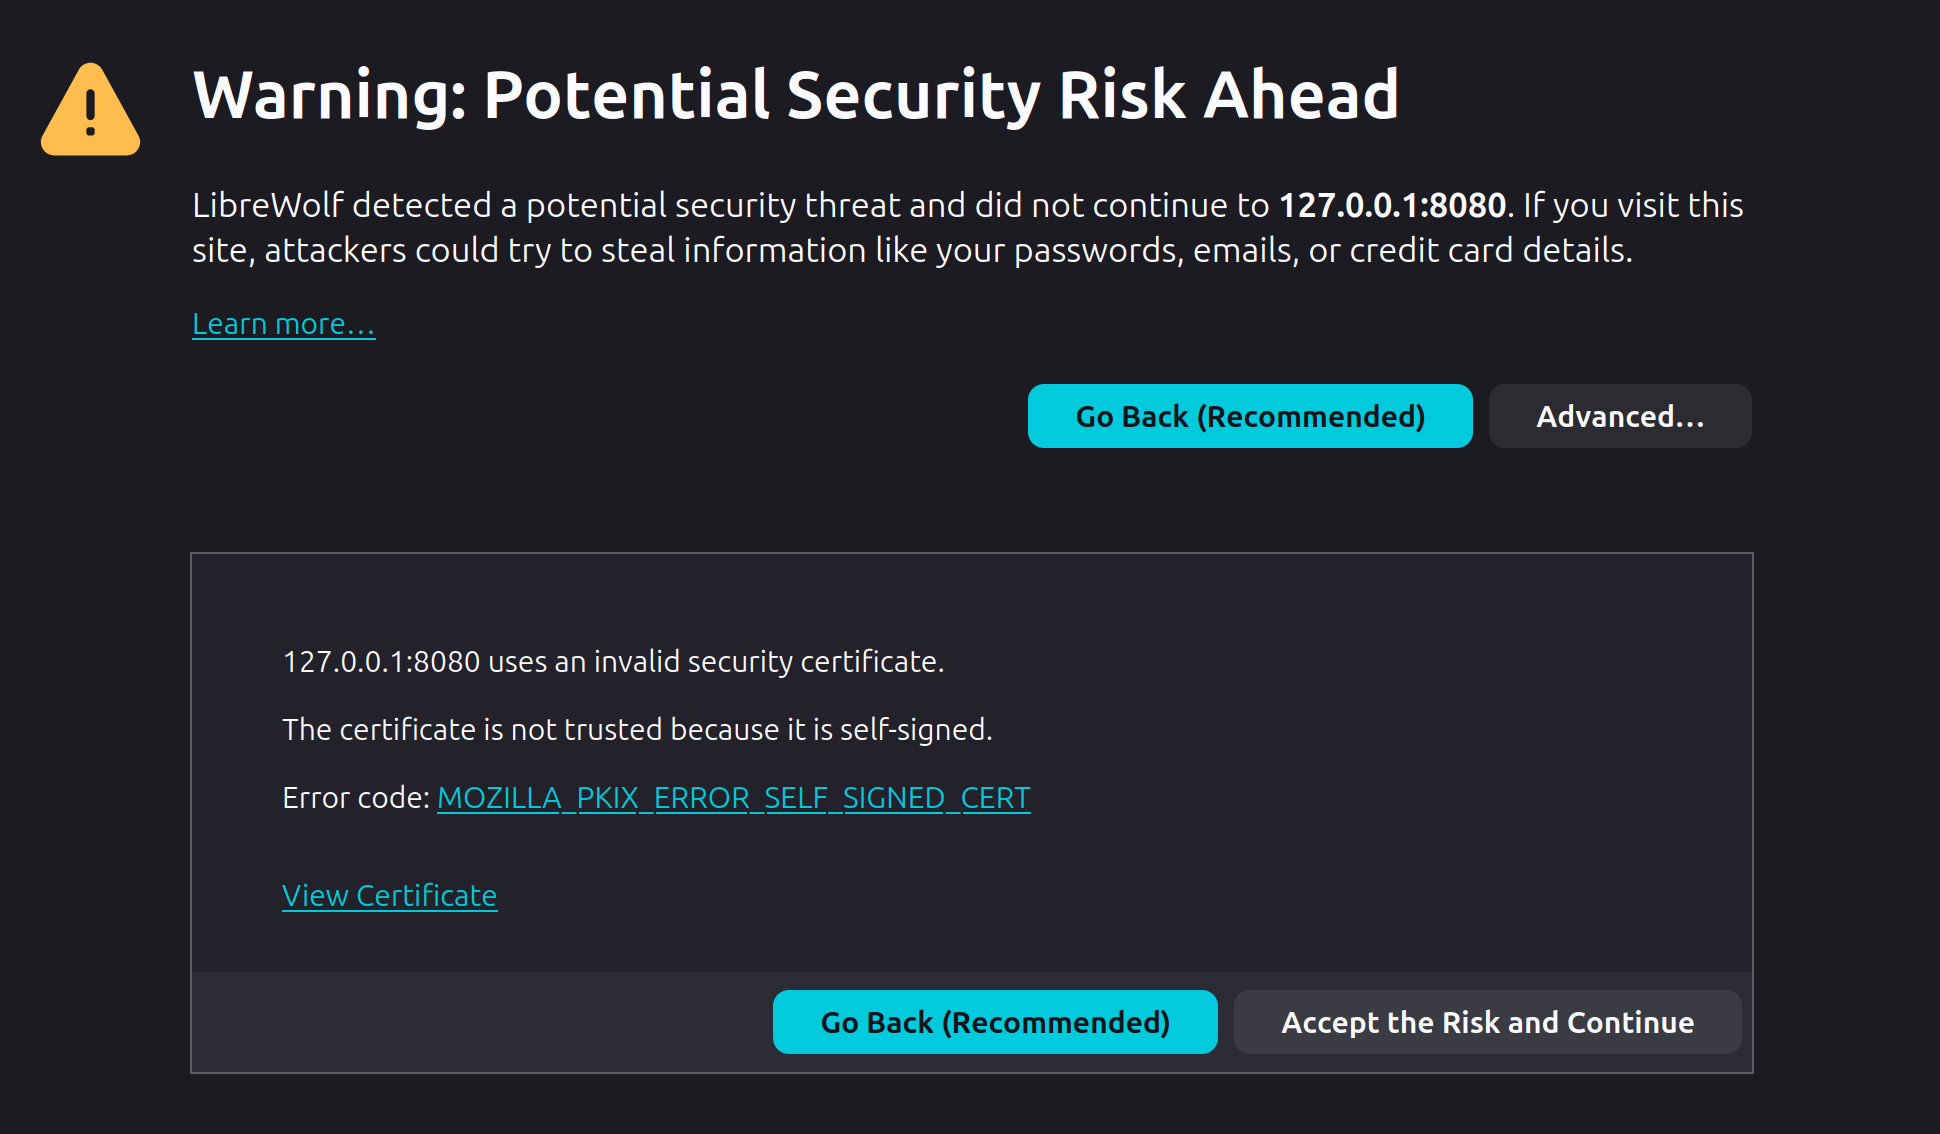
you can access the nextcloud-aio-mastercontainer via browser using https://127.0.0.1:8080 . accept the warning while accessing the url. Image:6a- Access Nextcloud-AIO Server On Host Machine
login with given "passphrase" for first time setup.
enter your desired domain name for your nextcloud server. Make sure it should match with your self-signed certs files entry and DNSmasq configuration.
you can enable optional containers as per your requirements, however minimal setup is adviced for first time setup or testing setups.
click "download and start containers".
Wait until process completed & all containers downloaded.
Once all containers download and up, page will show as below. Image:6g- Access Nextcloud-AIO Server Initial Setup
Note : You may use docker ps command to check if all containers are up and healthy. For better output run below command.
Dont click on "open your nextcloud" button yet, we need to run proxy before accessing the admin login page.
Step 7. Run Apache Reverse Proxy
Now our nextcloud-aio server is up and running but we can not access it directly as it is running on its own network (docker network). we have to setup a reverse proxy server to access it.
Follow the below steps to setup reverse proxy server in your host system.
go inside your proxy directory using below command.
cd /home/user/docker/nextcloud/proxy/
create a httpd.conf file using below command.
vim httpd.conf
put the below configuration inside this file and save it.
# Global Settings
   ServerName nextcloud.homeserver.lan
   AllowEncodedSlashes On

   # Load Modules
   LoadModule mpm_prefork_module modules/mod_mpm_prefork.so
   LoadModule unixd_module modules/mod_unixd.so
   LoadModule log_config_module modules/mod_log_config.so
   LoadModule alias_module modules/mod_alias.so
   LoadModule proxy_module modules/mod_proxy.so
   LoadModule proxy_http_module modules/mod_proxy_http.so
   LoadModule ssl_module modules/mod_ssl.so
   LoadModule headers_module modules/mod_headers.so

   # Docker Logging
   ErrorLog /dev/stderr
   CustomLog /dev/stdout combined
   LogLevel warn

   # Listen Directives
   Listen 0.0.0.0:80
   Listen 0.0.0.0:443

   # HTTP to HTTPS Redirect
   <VirtualHost *:80>
       ServerName nextcloud.homeserver.lan
       Redirect permanent / https://nextcloud.homeserver.lan/
   </VirtualHost>

   # HTTPS Proxy to Nextcloud AIO
   <VirtualHost *:443>
       ServerName nextcloud.homeserver.lan
       SSLEngine on
       SSLCertificateFile /etc/ssl/certs/fullchain.pem
       SSLCertificateKeyFile /etc/ssl/certs/privkey.pem

       ProxyPreserveHost On
       ProxyPass / http://127.0.0.1:11000/ nocanon
       ProxyPassReverse / http://127.0.0.1:11000/

       ProxyPreserveHost On
       SSLProxyEngine On
       SSLProxyVerify None
       SSLProxyCheckPeerCN Off
       SSLProxyCheckPeerName Off


       Header always set Strict-Transport-Security "max-age=31536000; includeSubDomains"
   </VirtualHost>
now create docker-compose file for apache reverse proxy server.
vim docker-compose.yml
put below configuration inside your docker-compose.yml file
make sure the ./certs & ./httpd.conf option under volumes should map with respective path.
now run the below command to make reverse proxy server up.
docker compose up -d  #or
docker-compose up -d
wait for the reverse proxy server downloading and runnning , confirm with docker ps command to verify.
once reverse proxy is up and healthy, you are ready to click on "open your nextcloud" button under your `nextcloud-aio-mastercontainer` web page.
login with default admin credentials.
hurrey ! you have successfully setup nextcloud-aio server in your LAN network.
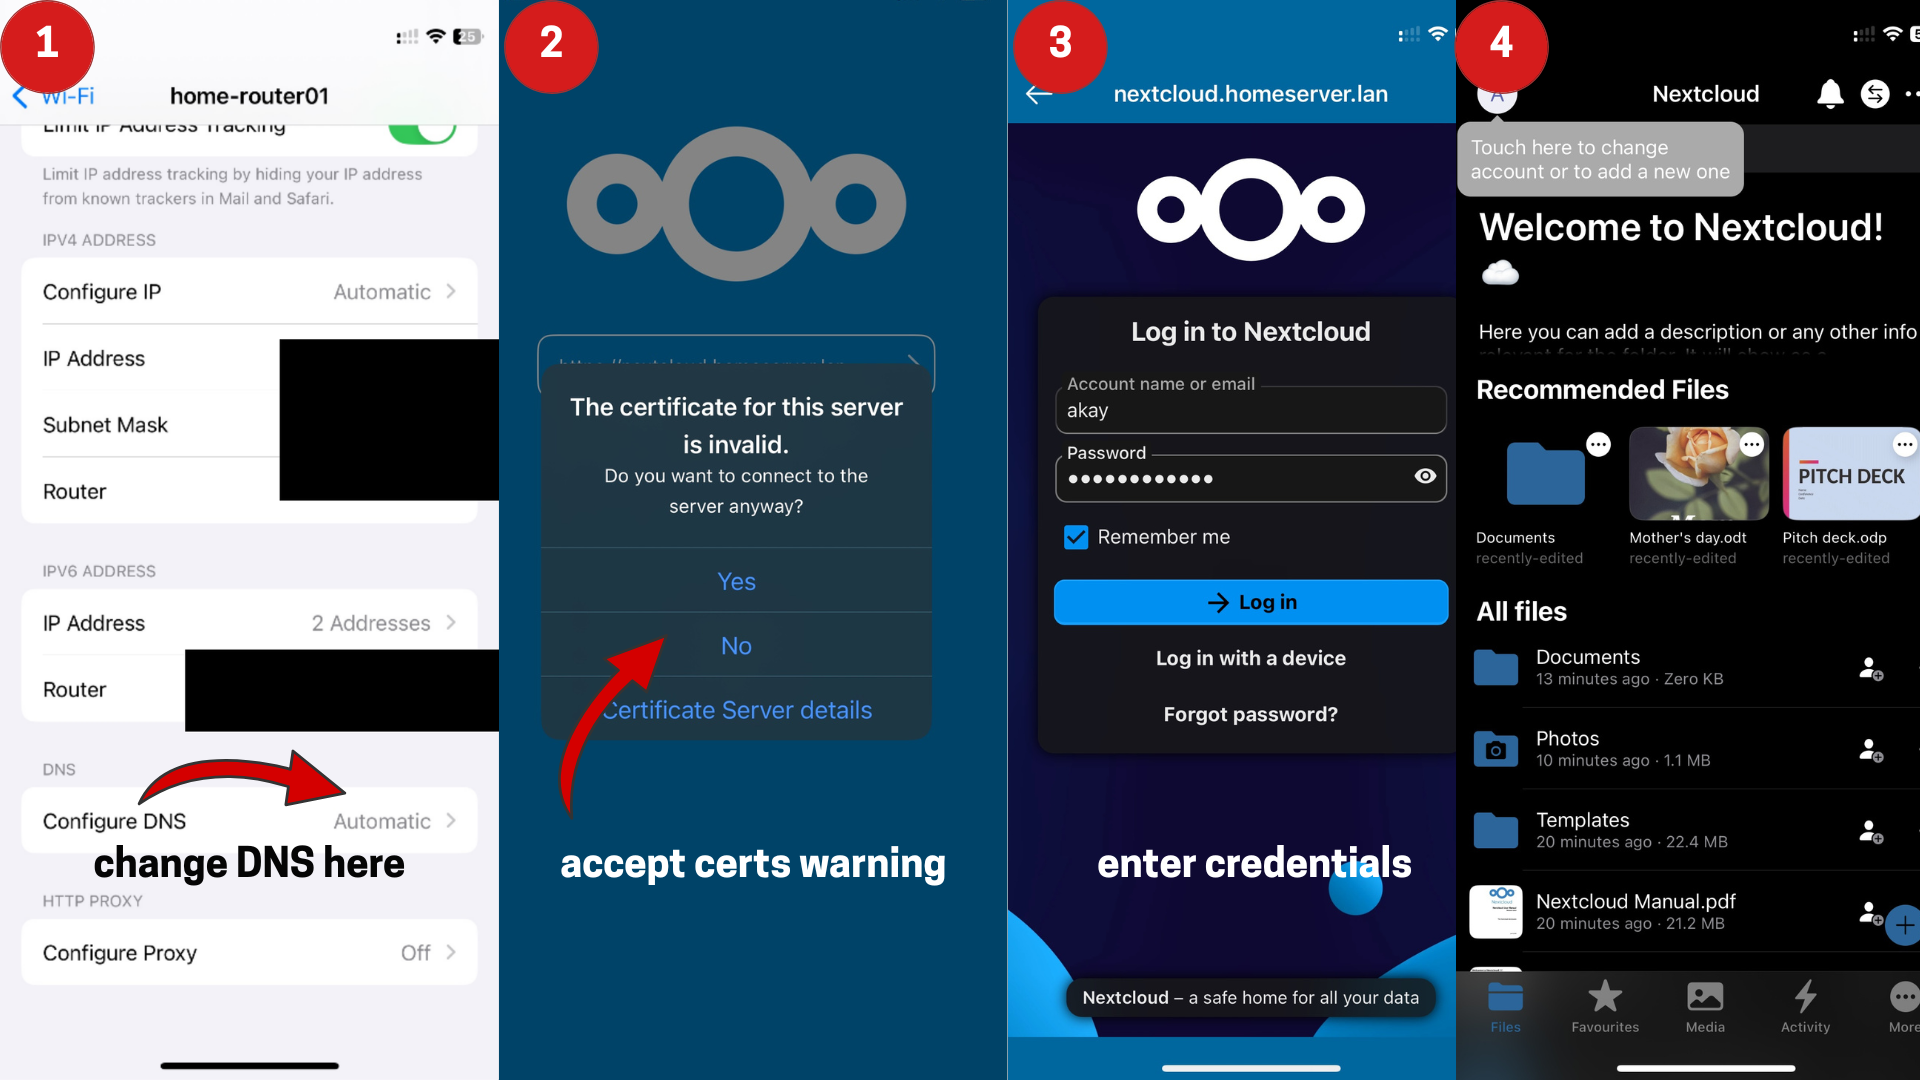
Step 7. Steps To Connect Client Devices
make sure your client devices are connected to same local network which your host system is connected.
update the DNS entry in your home router with your host system's IP address as we are running DNSmasq as DNS server in our host machine. if your router is not configurable, you should modify the DNS entry inside your client device's current connection's IP configuration.
open your nextcloud domain in client's browser application (e.g nextcloud.homeserver.lan), If all services are running healthy, you should be able to access the login page of your nextcloud server.
download the official apps in your mobile client devices to access the nextcloud account. Image:7a-Nextcloud-AIO Client Devices Access
Hurray ! We have successfully setup Nextcloud-AIO server in local network.
Note: Nextcloudofficials regularly provides updates for its all containers including nextcloud-aio-mastercontainer to improve performance,security and new features. Therefore there might be some chances that some features or containers may required additional tweaks or modification in their configuration to work properly.
This guide is 100 % tested, practically performed before publishing. And solely intent to provide step by step guide to whom who are willing to setup self-hosted Nextcloud-AIO in their local network.
It takes huge efforts to create such a long post. If you find this post worth please share it with others as well.. :)